Chicken Enchiladas in Green Chilli Sour Cream Sauce

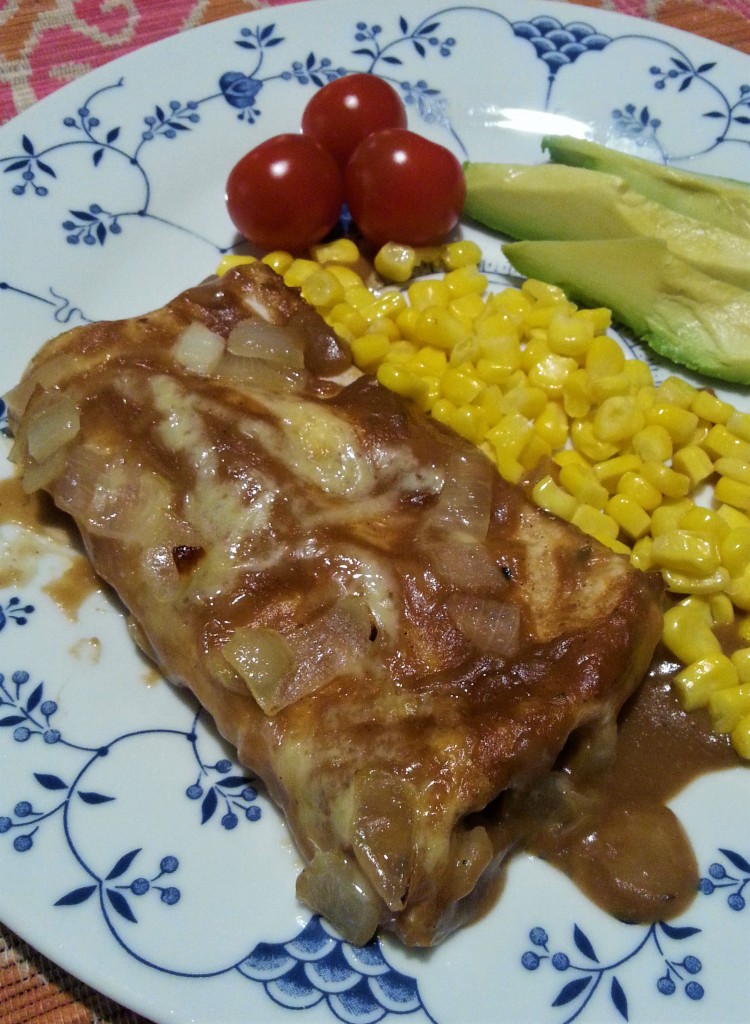
I’m finally getting around to sharing my absolute favourite meal of all time with you, Chicken Enchiladas in Green Chilli Sour Cream Sauce. They are the most delicious enchiladas I’ve ever had. The creamy green chilli sauce is so damn good. The enchiladas are filled with pulled roast chicken and cheese. That part is super easy. The sauce is what it’s all about. It does take some time to make, but, trust me, this dish is worth the effort. I made these enchiladas again and again, over a few years, tweaking the recipe until it was perfect. It is one of those recipes that have become like a part of me, since I spent so much time reworking it. I enjoyed every moment of it. It was a labor of love and deliciousness.

I asked my partner to make these enchiladas for my most recent birthday in January. Usually, we order take away for the occasion, but, this year, I decided that I would rather have these enchiladas. Honestly, I would take these over any restaurant dish. They are that good. So, maybe you’d like to make them for Valentine’s Day, this weekend, or no reason at all. I know you’re going to love them.

Enjoy the recipe…

Chicken Enchiladas in Green Chilli Sour Cream Sauce

  • Servings: 4 (2 enchiladas per serving)
  • Print

These are seriously the best enchiladas ever. The green chilli sour cream sauce is incredibly delicious. Better than takeaway and totally worth the effort.

Ingredients

  • 8 large flour tortillas
  • 3 cups shredded Tasty/ mild cheddar cheese, divided into 2 and 1 cups
  • 4 cups shredded cooked chicken (preferably roasted)
  • 3 Tbsp butter
  • 3 Tbsp flour
  • 3 cups chicken stock/broth
  • 2 cups/ 500g sour cream (NOT low fat)
  • 2 green chilis, de-seeded and finely diced
  • ½ cup fresh coriander/ cilantro, chopped, plus more to serve
  • 1 brown onion, diced
  • 4 garlic cloves, minced
  • A drizzle of olive oil

Directions

  1. Preheat oven to 425 F/ 220 C/ 210 C fan-forced.
  2. To make the sauce: In a saucepan, melt the butter over medium heat. Saute onions in butter and olive oil until translucent, about 5-10 minutes. Add green chili and garlic to pan and saute for about 2 minutes. Whisk in the flour, and cook for 1 minute, to make a roux. Whisk in the chicken broth, whisking constantly until flour is incorporated and sauce is smooth. Simmer sauce for several minutes, until thick and creamy. Stir in a coriander/ cilantro leaves. Simmer until leaves are soft.
  3. Remove pan from heat. Whisk in 1 cup sour cream.
  4. Lightly grease (spray oil) a 9×13” Pyrex baking dish. Spread some sauce on bottom of pan.
  5. In a large bowl, mix together shredded chicken and 2 cups cheese.
  6. Warm tortillas in microwave per package instructions, to soften.
  7. In each tortilla, place about 2 Tbsp. of the chicken mixture. Roll tortilla up tightly, and place seam-side down, into baking dish.
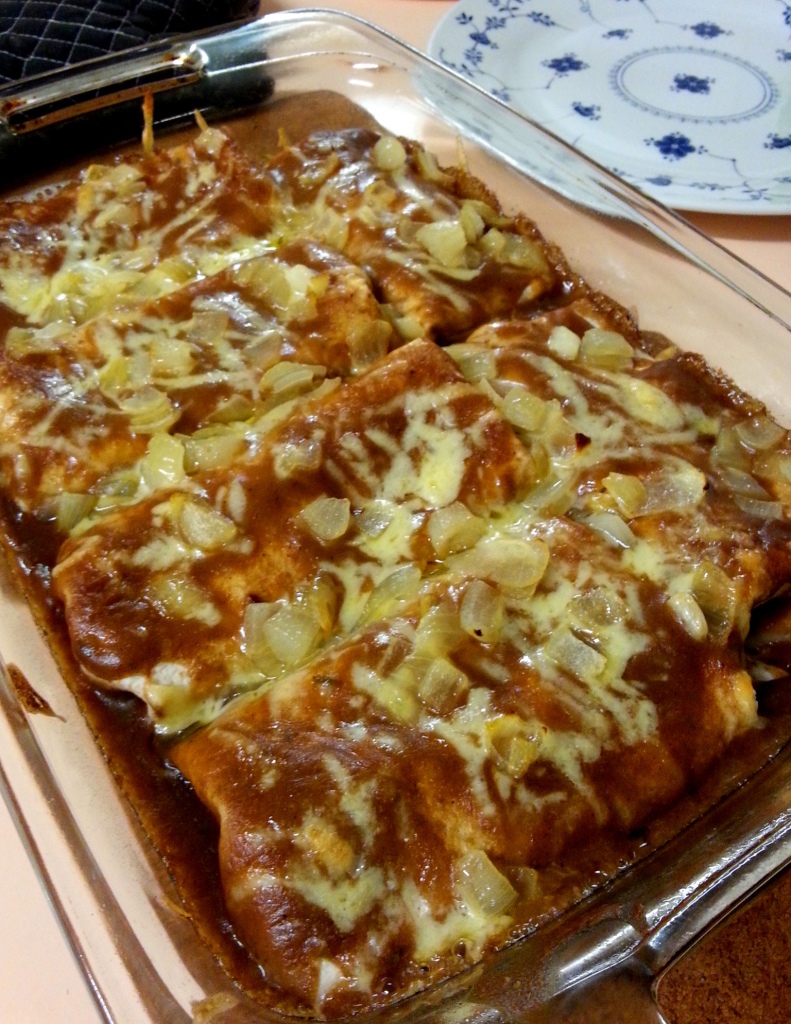
  8. Pour sauce over enchiladas in baking dish, covering them completely. Sprinkle 1 cup cheese over top of enchiladas.
  9. Bake for 20 to 25 minutes. Cover with foil after first 10 – 15 minutes, to avoid burning the top, if necessary.
  10. To serve, garnish with fresh coriander/ cilantro.

This recipe was created by Kim Sequoia for a delicious moment.

All written content and photos are copyright Kim Sequoia 2021 for a delicious moment.

Peanut Butter Chocolate Chip Banana Bread

Let me just start by saying that I love all things peanut butter and chocolate. Maybe it has something to do with being from Ohio, the Buckeye state–and I mean the kind of buckeye which is a little bite of sweet peanut butter goodness covered in chocolate, not the tree. Or maybe it’s simply because it is just such a delicious combination. In any case, I am a firm believer that peanut butter and chocolate are a match made in heaven. I also believe that this mix is the perfectly decadent way to upgrade a classic treat, like in the case of banana bread. This peanut butter chocolate chip banana bread is so good. Like next level, where-have-you-been-all-my-life good. It’s got peanut butter in the batter, peanut butter chips, milk chocolate chips, and a swirl of sweetened peanut butter. Need I say more? You need to go make it right now.

Back story… (Scroll down to the recipe if you cannot wait to run to the kitchen and make this banana bread–I wouldn’t blame you.) I tried this recipe once before, changing things up just a bit, mainly to make it more like my favourite Chai Banana Bread. I really enjoyed it, but I thought I wouldn’t mind having just a bit more peanut butter flavour.

So, this time, I added a swirl of a sweet, creamy peanut butter mixture. It was inspired by my favourite childhood sandwich, which my grandma would make when she babysat me and my younger brother. She would mix peanut butter with a little margarine and maple syrup to make a sweet, creamy spread. We would always beg her to make it for us. I still make one of those sandwiches once in a great while.

Anyway, back to this awesome banana bread… The swirl really does add even more peanut buttery goodness, but it is totally optional. This banana bread is wonderful with or without it. I hope you’ll enjoy it.

Here’s the recipe…

Peanut Butter Chocolate Chip Banana Bread

This peanut butter chocolate chip banana bread is so good. Like next level, where-have-you-been-all-my-life good. It's got peanut butter in the batter, peanut butter chips, milk chocolate chips, and a swirl of sweetened peanut butter. Need I say more? You need to go make it right now.

This recipe was adapted from Oh, Sweet Basil.

Ingredients

  • 1 3/4 cup all-purpose flour
  • 1 tsp baking soda/ bi-carb soda
  • 1 1/4 tsp cream of tartar
  • 1/2 tsp salt
  • 1/3 cup/ 75g unsalted butter
  • 1/3 cup creamy peanut butter
  • 2/3 cup brown sugar
  • 2 large eggs
  • 1 cup mashed bananas (2-3 medium overripe bananas)
  • 1 cup chocolate chips (milk and/ or dark chocolate)
  • 1/2 cup peanut butter chips
  • 1 tsp vanilla extract

For peanut butter swirl (optional but so good!)

  • 1/3 cup creamy peanut butter
  • 1 Tbsp margarine
  • drizzle of maple syrup

Directions

  1. Preheat the oven to 350F/ 160-180C (if your oven runs a bit hot, like mine, then go for the slightly lower temp).
  2. Prepare a standard size loaf pan by spraying with oil, lining with baking paper with extra on the sides, to pull bread out of pan when cooled, and then spraying the paper with oil.
  3. In a medium bowl, whisk together the flour, baking soda/ bi-carb soda, cream of tartar, and salt. Set aside.
  4. Cut butter in cubes and melt it. I like to use a Pyrex measuring cup loosely covered with plastic wrap. Microwave the butter in 30 second increments until just melted. Remove plastic wrap and allow to cool for a few minutes.
  5. Whisk peanut butter into the melted butter.
  6. In a large bowl, mash bananas. Add peanut butter mixture to bananas and whisk until combined. Stir in brown sugar, eggs, and vanilla.
  7. Gently fold dry mixture into banana mixture.
  8. Fold in chocolate chips and peanut butter chips.
  9. If making the sweetened peanut butter swirl, whisk all ingredients together until very smooth, like the texture of buttercream frosting. Drop a few (like 5-6) blobs of sweetened peanut butter onto the top of the batter. Swirl around with a knife or offset spatula.
  10. Press several chocolate chips on top of the batter, to make it look pretty (optional).
  11. Bake banana bread for about 45 minutes, tenting with foil for the last 10 minutes or so, to avoid the crust getting too dark.
  12. Once bread is baked, allow to cool in pan on wire rack for at least 20 minutes, loosely covered with a clean tea towel.
  13. Pull bread out of pan, using the baking paper. Allow to cool completely before slicing. Store banana bread in a tightly sealed container. It will stay fresh for about 3 days.

This recipe was created by Kim Sequoia for a delicious moment.

All written content and photos are copyright Kim Sequoia 2020 for a delicious moment.

Cheese Enchiladas with Chili Gravy

After a few months of… well, life as we know it changing quite a bit, among other things going on personally, I’m trying to get back into posting recipes here. I was feeling kind of over it, but I have been realizing that friends, family, and others continue to use and enjoy my recipes, and I really enjoy sharing them. So I’m back, at least occasionally.

To get back into the swing of things, today I’m sharing one of my absolute favourite recipes. This is the kind of dish that might not look pretty, but it tastes fantastic. The reason I had waited for so long to share it is because it doesn’t photograph well (not to mention my lack of photography skills, which is one of the main reasons I’ve been feeling less-than-thrilled with doing this blog)… but, anyway, to hell with the photos. Let’s focus on the awesome recipe!

My family totally loves these enchiladas with chili gravy. The Tex-Mex chili gravy is the star of the show here. It is deceptively simple. This velvety smooth, spicy gravy has such a delicious flavour from the toasted spices. It starts out with a simple roux, then you toast the spices. Trust me on this, it’s really good. I like to keep the filling of the enchiladas basic, using just mild cheddar. The gooey cheese enchiladas go so well with the spicy gravy.

I have tried a few variations of these enchiladas, like adding shredded roast chicken and/ or sauteed chilis/ peppers to the filling, and using chicken stock instead of beef stock. I have made them spicier (to my taste) or milder (for the sake of young children). I think the recipe below is the very best version. Of course, feel free to tweak it to suit your needs and tastes. That’s one of the great things about enchiladas, you can easily change them as you like. Of course, I hope you will try the recipe as it is, at least the first time you make it.

Enjoy!

Cheese Enchiladas with Chili Gravy

Yield: 3-6 servings (1 serve: 1-2 tortillas)

The Tex-Mex chili gravy is the star of the show here. It is deceptively simple. This velvety smooth, spicy gravy has such a delicious flavour from the toasted spices. Trust me on this, it’s really good. I like to keep the filling of the enchiladas basic, using just mild cheddar. The gooey cheese enchiladas go so well with the spicy gravy.

Recipe source: adapted from homesick texan.

Chili Gravy


Ingredients:

  • 1/4 cup vegetable oil (canola)
  • 1/4 cup all-purpose flour 
  • 1/2 teaspoon black pepper 
  • 1/4 teaspoon salt 
  • 1 teaspoon powdered garlic 
  • 2 teaspoon ground cumin 
  • 1/2 teaspoon dried oregano
  • 1/2 tsp onion powder
  • 1/4 tsp chili powder (or to taste)
  • 2 cups beef stock

    Directions:
  1. Measure all spices first, put in a small bowl, and stir with a spoon. Set aside.
  2. Heat the oil in a skillet over medium-high heat. Stir in the flour and continue stirring for 3 to 4 minutes, or until it makes a light brown roux. Take care not to burn the roux.
  3. Add the spices, gradually, and continue to cook for 1-2 minutes, constantly stirring and blending ingredients. Add the stock, gradually, mixing and stirring constantly. Turn heat to low and let sauce simmer for 15 minutes, until sauce thickens. Add water to adjust the thickness, if necessary. Turn off the heat and cover skillet, to keep from having a “skin” form on top of the gravy, as you prepare the enchiladas.

Makes 2 cups of gravy

Cheese Enchiladas


Ingredients:

  • 6 regular size flour tortillas 
  • 4 cups shredded cheddar cheese (you can use Velveeta, in America; use mild or Tasty cheddar, in Australia) plus more for the top of the enchiladas
  • 1 large brown onion, diced
  • 2 Tbsp canola or extra virgin olive oil
  • 2 cups chili gravy
  • Seasonings, to taste: cumin, onion powder, oregano

*Optional additional ingredients:

2½ cups shredded roast chicken

1/2 can black beans, drained and rinsed

2-3 green chilis or jalapenos, deseeded and finely diced

Directions:

  1. Preheat the oven to 450F/230C/ 210C fan-forced.
  2. Grease (spray canola oil) a 9×13” Pyrex or ceramic baking dish.
  3. Using a large non-stick skillet/ pan, heat oil over medium-low heat until oil shimmers in the pan. Sauté onions until soft and lightly browned. Cover, at first, on low-med heat (mark 5), to soften onions. Then remove cover, to brown onions and allow moisture to evaporate.
  4. Warm tortillas in microwave on high for 1 minute, in the package.
  5. Pour 1/3 cup of chili gravy in bottom of baking pan and spread to coat the bottom completely.
  6. Mix cheese and seasonings in a medium bowl. Stir in chicken, black beans, and/or chilis, if using. Set aside.
  7. To make enchiladas, take a tortilla, put 1/4 cup (or a handful) of cheese mixture in the center and roll it, tucking ends inside.
  8. Place rolled tortilla in baking dish, seam side down. Repeat with remaining 5 tortillas, leaving a slight gap between them, to let the chili gravy pour down between them.
  9. Pour remaining chili gravy over the rolled tortillas. Sprinkle sauteed onions and shredded cheese on top. Bake for 10-12 minutes, or until sauce is bubbly and cheese is melted.

This recipe was created by Kim Sequoia for a delicious moment. All written content and photos are copyright Kim Sequoia 2020 for a delicious moment.

Easter Bunny and Nest Cupcakes

Easter Bunny and Nest Cupcakes

This year, with the whole world being shut down in response to the coronavirus pandemic, I’m finding myself feeling torn about celebrating Easter. On one hand, I’m feeling quite sad that we cannot have Glen’s family over for our annual Easter lunch. On the other hand, I want to celebrate the holiday to bring a bit of joy to my family. Joy is winning. I can’t let an Easter go by without doing something special to make my children smile. I may not be able to do as much as I would normally do, but I’m doing what I can. I will be decorating, doing crafts with my older son, making a delicious lunch, and doing a little baking. It’s going to be my baby boy’s first Easter, so that makes it pretty special for us. We will have a lovely small celebration just for our family.

Easter Bunny and Nest Cupcakes

Easter Bunny and Nest Cupcakes

A few weeks ago, my 6 year-old son asked me if the Easter Bunny could get the coronavirus, and if he would still be able to come to our house. That just broke my heart. I told him that the Easter Bunny is magical, so, of course he will still come to our house and hide lots of chocolate eggs for him to find. The Easter Bunny is ready, don’t worry.

Easter Bunny and Nest Cupcakes

Easter Bunny and Nest Cupcakes

One thing I have had trouble finding, during this unfortunate time, is flour, so I won’t be baking anything homemade for Easter this year. I bought a box of Betty Crocker brownie mix instead. Hey, I’m doing what I can.

If you are lucky enough to have the ingredients, perhaps you’d like to bake these lovely Easter cupcakes. I made them last year for our Easter lunch. These pink velvet cakes with cream cheese frosting are so pretty and just delicious. Buttermilk is what gives velvet cake its plush crumb. Chocolate bunnies and candy nests make these cakes an adorable Easter treat. The nests are made with Cadbury Flake and Cadbury Mini Eggs. The chocolate bunnies are by Lindt. Of course, you could substitute other small chocolate bunnies. If you can’t find Flake, you could use toasted coconut for the nests instead. You could use jelly beans instead of mini eggs, if you like. There are lots of possible variations. (By the way, this is not a sponsored post. I just used what I like.)

Easter Bunny and Nest Cupcakes

I wish you and yours a lovely Easter, for those celebrating. And I wish everyone, everywhere health and happiness.

Enjoy the recipe…

Easter Bunny and Nest Cupcakes

These pink velvet cakes with cream cheese frosting are so pretty and just delicious. Chocolate bunnies and candy nests make them an adorable Easter treat.

Pink velvet cupcakes recipe lightly adapted from i heart naptime.

Ingredients

Pink velvet cupcakes:

  • 1 1/4 cups flour
  • 3/4 teaspoon baking powder
  • 1/4 teaspoon baking soda/ bi-carb soda
  • 1/4 teaspoon salt
  • 1/2 cup sugar
  • 1/2 cup/ 113 g unsalted butter, melted and cooled slightly
  • 2 large eggs
  • 1 teaspoon vanilla extract
  • 1/2 cup buttermilk
  • Pink food colouring (I used just 1 drop, but yours may vary)


Cream cheese frosting:


  • 4 ounces/ 120g/ 1 cup cream cheese , softened
  • 1/2 cup/ 113g unsalted butter, softened
  • 3 cups powdered sugar/ soft icing mixture
  • 1 teaspoon vanilla extract
  • 1-2 Tablespoons half and half, heavy cream, or thickened cream
  • Green food colouring


To decorate:


  • 6 small chocolate bunnies (I used Lindt bunnies)
  • Cadbury Flake (or toasted shredded, sweetened coconut)
  • Cadbury Mini Eggs (or jelly beans)

Directions

  1. Preheat the oven to 350°F/ 180°C. Line a cupcake pan/ muffin tin with paper liners/ pattypans.
  2. In a large bowl, whisk together the flour, baking powder, baking soda/ bi-carb soda, and salt.
  3. In the bowl of a stand mixer or a large bowl using a handheld electric mixer, add the sugar and melted, cooled butter. Using the whisk attachment on your mixer, cream butter and sugar together until pale and fluffy.
  4. Switch to the paddle attachment on your mixer. Add flour mixture to sugar and butter mixture, in 3 batches, mixing well each time. Mix until flour mixture is fully incorporated.
  5. Add the eggs one at a time, mixing gently after each addition. Add the vanilla and buttermilk. Mix gently until just combined. Add the pink food colouring and mix until the colour is evenly distributed through the frosting.
  6. Scoop the batter into the prepared pan, filling the cups 1/2 to 2/3 full.
  7. Bake cupcakes for 15 to 18 minutes, or until the tops spring back when lightly touched and a toothpick tester comes out clean except for a few crumbs.
  8. Remove cupcakes from oven and allow to cool.
  9. To make the frosting, add the cream cheese and butter to the bowl of your mixer and beat, using the paddle attachment, until smooth. Add the powdered sugar/ soft icing mixture and vanilla and beat until smooth. Add 1 Tablespoon of half and half or cream and beat on high until light and fluffy. Add additional half and half or cream, as needed, to make a light and fluffy frosting. Add green food colouring, a drop at a time, mixing well, until desired shade is reached and the colour has mixed in thoroughly.
  10. Pipe frosting onto cooled cupcakes. I piped “grass” for the bunny cupcakes and simple spirals for the nest cupcakes. You could use a knife or a small offset spatula to frost the cupcakes, if you’re not into piping.
  11. Top half the cupcakes with small chocolate bunnies.
  12. Top half the cupcakes with nests. To make nests, break apart Cadbury Flake into small bits and arrange them in a circle on top of the frosting. (Or use toasted shredded, sweetened coconut.) Add 3 or 4 Cadbury Mini Eggs (or jelly beans) to each nest.

This recipe was created by Kim Sequoia for a delicious moment.

All written content and photos are copyright Kim Sequoia 2020 for a delicious moment.


Easter Bunny and Nest Cupcakes


Iced Cut-Out Sugar Cookies

Iced Cut-Out Sugar Cookies

I always have loved soft sugar cookies. They have to be really good ones, though–not dry, hard, or flavourless. So many cut-out sugar cookies look lovely, but, often, the taste is disappointing. Not these cookies! They are soft on the inside, firm on the edges, and taste wonderful. They have an easy glaze icing. This is my go-to recipe for any occasion cut-out cookies.

Iced Cut-Out Sugar Cookies

Last year, my son and I used this recipe to make big heart-shaped cookies for Valentine’s Day. We had a lot of fun cutting them out, icing them in two shades of pink, and adding pretty sprinkles. Ok, really, I had fun doing most of the work, while he cut out a few cookies, then watched TV until it was time to do the sprinkles. He did sprinkles on one cookie and then wanted to eat it right away. How could I say no? These cookies are so good, it’s not easy to resist the temptation to eat one as soon as possible. I do recommend waiting to let the icing set up. They look prettier that way.

Iced Cut-Out Sugar Cookies

Enjoy the recipe…

Iced Cut-Out Sugar Cookies

  • Servings: 12 large or 24 small cookies
  • Print

Easy, delicious cut-out sugar cookies with firm edges and soft centers and a simple glaze icing. These cookies are great for any occasion!

This recipe was adapted from Holiday Cut-Out Sugar Cookies with Easy Icing from Sally’s Baking Addiction.

Ingredients

Cookies

  • 3/4 cup (170g) unsalted butter, slightly softened to room temperature
  • 3/4 cup (150g) granulated sugar
  • 1 large egg*
  • 2 teaspoons pure vanilla extract
  • 1/2 teaspoon almond extract (optional, but makes the flavor outstanding)
  • 2 and 1/4 cups (281g) all-purpose flour (spoon and leveled)
  • 1/2 teaspoon baking powder
  • 1/4 teaspoon salt

Easy Icing

  • 1 and 1/2 cups (180g) confectioner’s sugar/ soft icing mixture, sifted (must have no lumps)
  • 1/2 teaspoon pure vanilla extract
  • 1 teaspoon light corn syrup*
  • 2 – 2.5 Tablespoons (30-38ml) room temperature water
  • pinch salt*
  • food coloring, if using

Directions

  1. Plan ahead when making these cookies. Keep in mind that the cookie dough will need to chill, the cookies need to cool completely before being iced, and the icing needs 24 hours to completely harden. If you want to enjoy the cookies right away, and having hardened icing isn’t a priority for you, then you’ll only need about 4 hours to make these cookies.
  2. In a large bowl, using a handheld mixer or stand mixer fitted with the paddle attachment, beat the butter until creamed and smooth – about 1 minute. Add the sugar and beat on high speed until light and fluffy, about 3 or 4 minutes. Scrape down the sides and bottom of the bowl as needed. Add the egg, vanilla, and almond extract and beat on high until fully combine, about 2 minutes. Scrape down the sides and bottom of the bowl as needed.
  3. Whisk the flour, baking powder, and salt together in a medium bowl. Turn the mixer down to low and add about half of the flour mixture, beating until just combined. Add the rest of the flour and continue mixing until just combined. If the dough still seems too soft, you can add 1 Tablespoon more flour until it is a better consistency for rolling.
  4. Divide the dough into 2 equal parts. Roll each portion out onto a piece of parchment to about 1/4″ thickness. Stack the pieces (with baking paper) onto a baking sheet, cover lightly, and refrigerate for at least 1-2 hours and up to 2 days. Chilling is mandatory, for the dough to set up enough to hold its shape when making cut-outs.
  5. Once chilled, preheat oven to 350°F (180°C). Line 2-3 large baking sheets with parchment/ baking paper or a silicone baking mat. The number of batches will depend on how large or small you cut out your cookies. Remove one of the dough pieces from the refrigerator and, using a cookie cutter, cut in shapes. Transfer the cookie dough shapes to the prepared baking sheet. Re-roll the remaining dough and continue cutting until all is used. Re-chill the dough if it starts getting too soft and gooey. Then cut out more shapes until all the dough is used.
  6. Bake cookies for 10-12 minutes, until very lightly colored on top and around the edges. Do not overbake! Make sure you rotate the baking sheet halfway through bake time, unless you have a fan-forced oven.
  7. Allow cookies to cool on baking sheet for 5 minutes. Then transfer cookies to a wire rack to cool completely before icing. There is no need to cover the cookies as the cookies cool.
  8. For the icing, whisk together the confectioner’s sugar/ soft icing mixture, vanilla, corn syrup (if using), and 2 tablespoons of water in a medium bowl. The icing should be quite thick. If it looks too thick, add 1/2 Tablespoon more water. If it looks too thin, add 2 more Tablespoons of confectioners’ sugar. If you drizzle a little of the icing with the whisk, the ribbon of icing will hold for a few seconds before melting back into the icing. That is when you know it’s the right consistency and is ready to use. If desired, add liquid or gel food coloring. You can pour some icing into different bowls if using multiple colors. If not decorating cookies right away, cover the icing tightly and keep in the refrigerator for up to 2 days.
  9. Decorate the cooled cookies however you’d like. Squeeze bottles make decorating so easy. Enjoy the cookies right away or wait 24 hours for the icing to set and harden. Do not cover the cookies as the icing sets. Once the icing has set, these cookies make wonderful gifts. I find they stay soft for about 5 days at room temperature and up to 10 days in the refrigerator.

Notes

  1. Freezing Instructions: Plain or decorated sugar cookies freeze well up to 3 months. Wait for the icing to set completely before layering between sheets of parchment paper in a freezer-friendly container. Thaw cookies in the refrigerator or at room temperature. You can also freeze the cookie dough for up to 3 months before rolling it out. Prepare the dough through step 3, divide in half, flatten both halves into a disk, as you would do with pie crust, wrap each in plastic wrap, then freeze. Thaw the disks in the refrigerator, then bring to room temperature for about 1 hour. Roll out the dough as directed in step 4, then chill rolled out dough in the refrigerator for 45 minutes – 1 hour before cutting into shapes and baking.
  2. Egg: Room temperature egg is preferred to be easily dispersed in the cookie dough. Good rule of thumb: always use room temperature egg if recipe calls for butter at room temperature or melted.
  3. Corn Syrup: This is what gives the icing fabulous shine. You may leave it out if you aren’t concerned about shiny, glossy icing. I have never seen corn syrup here in Australia. I’m not sure what could be used in place of it. I didn’t use it, and the icing still looked lovely.
  4. Salt: I know salt isn’t a typical ingredient in cookie icing, but I like that little pinch of salt. I use about 1/8 teaspoon. OR you can add 1/4 teaspoon of salt to the dry ingredients in the cookie dough. I like it better used in the icing, though.

This recipe was created by Kim Sequoia for a delicious moment.

All written content and photos are copyright Kim Sequoia 2019 for a delicious moment.

Iced Cut-Out Sugar Cookies