Easter Bunny and Nest Cupcakes

Easter Bunny and Nest Cupcakes

This year, with the whole world being shut down in response to the coronavirus pandemic, I’m finding myself feeling torn about celebrating Easter. On one hand, I’m feeling quite sad that we cannot have Glen’s family over for our annual Easter lunch. On the other hand, I want to celebrate the holiday to bring a bit of joy to my family. Joy is winning. I can’t let an Easter go by without doing something special to make my children smile. I may not be able to do as much as I would normally do, but I’m doing what I can. I will be decorating, doing crafts with my older son, making a delicious lunch, and doing a little baking. It’s going to be my baby boy’s first Easter, so that makes it pretty special for us. We will have a lovely small celebration just for our family.

Easter Bunny and Nest Cupcakes

Easter Bunny and Nest Cupcakes

A few weeks ago, my 6 year-old son asked me if the Easter Bunny could get the coronavirus, and if he would still be able to come to our house. That just broke my heart. I told him that the Easter Bunny is magical, so, of course he will still come to our house and hide lots of chocolate eggs for him to find. The Easter Bunny is ready, don’t worry.

Easter Bunny and Nest Cupcakes

Easter Bunny and Nest Cupcakes

One thing I have had trouble finding, during this unfortunate time, is flour, so I won’t be baking anything homemade for Easter this year. I bought a box of Betty Crocker brownie mix instead. Hey, I’m doing what I can.

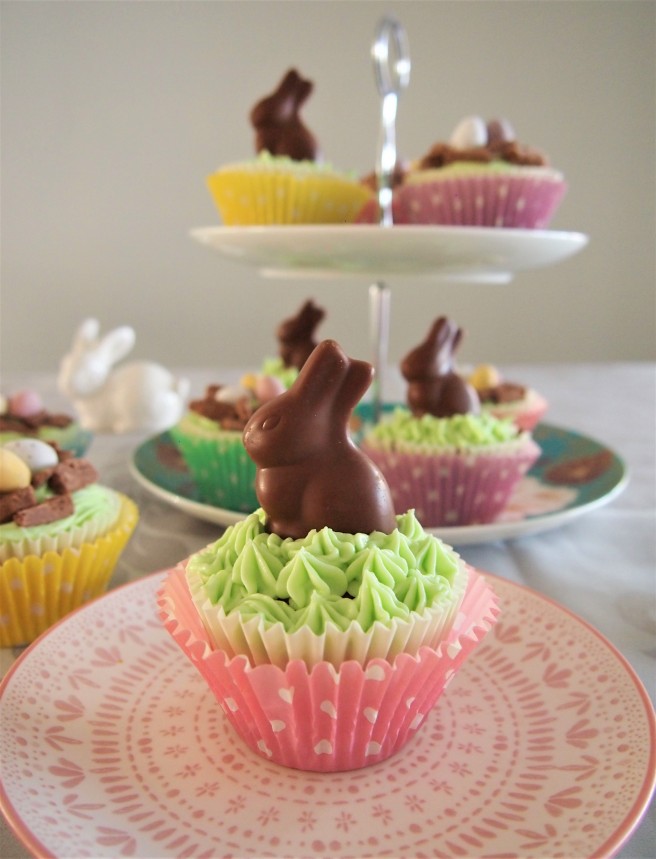
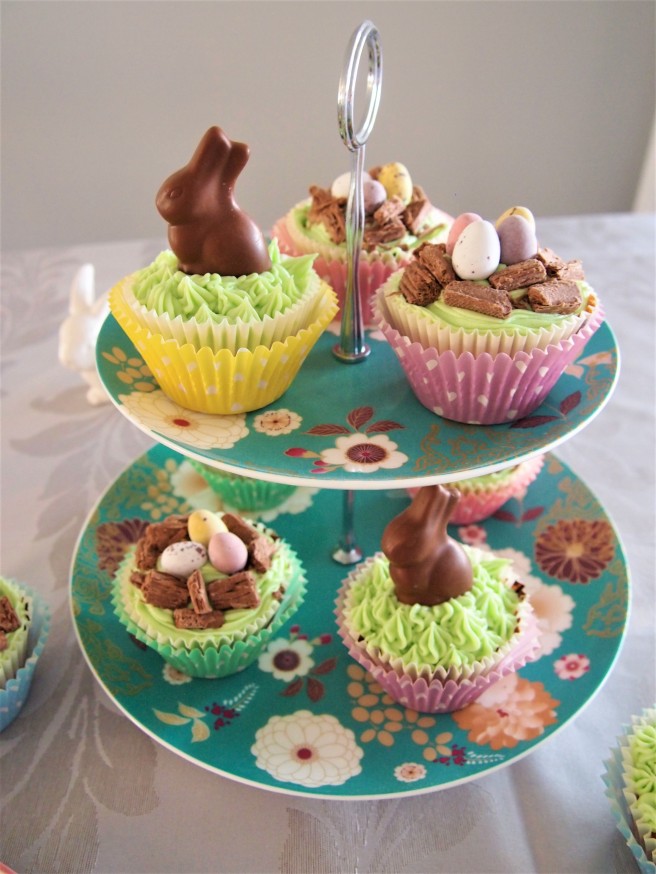
If you are lucky enough to have the ingredients, perhaps you’d like to bake these lovely Easter cupcakes. I made them last year for our Easter lunch. These pink velvet cakes with cream cheese frosting are so pretty and just delicious. Buttermilk is what gives velvet cake its plush crumb. Chocolate bunnies and candy nests make these cakes an adorable Easter treat. The nests are made with Cadbury Flake and Cadbury Mini Eggs. The chocolate bunnies are by Lindt. Of course, you could substitute other small chocolate bunnies. If you can’t find Flake, you could use toasted coconut for the nests instead. You could use jelly beans instead of mini eggs, if you like. There are lots of possible variations. (By the way, this is not a sponsored post. I just used what I like.)

Easter Bunny and Nest Cupcakes

I wish you and yours a lovely Easter, for those celebrating. And I wish everyone, everywhere health and happiness.

Enjoy the recipe…

Easter Bunny and Nest Cupcakes

These pink velvet cakes with cream cheese frosting are so pretty and just delicious. Chocolate bunnies and candy nests make them an adorable Easter treat.

Pink velvet cupcakes recipe lightly adapted from i heart naptime.

Ingredients

Pink velvet cupcakes:

  • 1 1/4 cups flour
  • 3/4 teaspoon baking powder
  • 1/4 teaspoon baking soda/ bi-carb soda
  • 1/4 teaspoon salt
  • 1/2 cup sugar
  • 1/2 cup/ 113 g unsalted butter, melted and cooled slightly
  • 2 large eggs
  • 1 teaspoon vanilla extract
  • 1/2 cup buttermilk
  • Pink food colouring (I used just 1 drop, but yours may vary)


Cream cheese frosting:


  • 4 ounces/ 120g/ 1 cup cream cheese , softened
  • 1/2 cup/ 113g unsalted butter, softened
  • 3 cups powdered sugar/ soft icing mixture
  • 1 teaspoon vanilla extract
  • 1-2 Tablespoons half and half, heavy cream, or thickened cream
  • Green food colouring


To decorate:


  • 6 small chocolate bunnies (I used Lindt bunnies)
  • Cadbury Flake (or toasted shredded, sweetened coconut)
  • Cadbury Mini Eggs (or jelly beans)

Directions

  1. Preheat the oven to 350°F/ 180°C. Line a cupcake pan/ muffin tin with paper liners/ pattypans.
  2. In a large bowl, whisk together the flour, baking powder, baking soda/ bi-carb soda, and salt.
  3. In the bowl of a stand mixer or a large bowl using a handheld electric mixer, add the sugar and melted, cooled butter. Using the whisk attachment on your mixer, cream butter and sugar together until pale and fluffy.
  4. Switch to the paddle attachment on your mixer. Add flour mixture to sugar and butter mixture, in 3 batches, mixing well each time. Mix until flour mixture is fully incorporated.
  5. Add the eggs one at a time, mixing gently after each addition. Add the vanilla and buttermilk. Mix gently until just combined. Add the pink food colouring and mix until the colour is evenly distributed through the frosting.
  6. Scoop the batter into the prepared pan, filling the cups 1/2 to 2/3 full.
  7. Bake cupcakes for 15 to 18 minutes, or until the tops spring back when lightly touched and a toothpick tester comes out clean except for a few crumbs.
  8. Remove cupcakes from oven and allow to cool.
  9. To make the frosting, add the cream cheese and butter to the bowl of your mixer and beat, using the paddle attachment, until smooth. Add the powdered sugar/ soft icing mixture and vanilla and beat until smooth. Add 1 Tablespoon of half and half or cream and beat on high until light and fluffy. Add additional half and half or cream, as needed, to make a light and fluffy frosting. Add green food colouring, a drop at a time, mixing well, until desired shade is reached and the colour has mixed in thoroughly.
  10. Pipe frosting onto cooled cupcakes. I piped “grass” for the bunny cupcakes and simple spirals for the nest cupcakes. You could use a knife or a small offset spatula to frost the cupcakes, if you’re not into piping.
  11. Top half the cupcakes with small chocolate bunnies.
  12. Top half the cupcakes with nests. To make nests, break apart Cadbury Flake into small bits and arrange them in a circle on top of the frosting. (Or use toasted shredded, sweetened coconut.) Add 3 or 4 Cadbury Mini Eggs (or jelly beans) to each nest.

This recipe was created by Kim Sequoia for a delicious moment.

All written content and photos are copyright Kim Sequoia 2020 for a delicious moment.


Easter Bunny and Nest Cupcakes


Iced Cut-Out Sugar Cookies

Iced Cut-Out Sugar Cookies

I always have loved soft sugar cookies. They have to be really good ones, though–not dry, hard, or flavourless. So many cut-out sugar cookies look lovely, but, often, the taste is disappointing. Not these cookies! They are soft on the inside, firm on the edges, and taste wonderful. They have an easy glaze icing. This is my go-to recipe for any occasion cut-out cookies.

Iced Cut-Out Sugar Cookies

Last year, my son and I used this recipe to make big heart-shaped cookies for Valentine’s Day. We had a lot of fun cutting them out, icing them in two shades of pink, and adding pretty sprinkles. Ok, really, I had fun doing most of the work, while he cut out a few cookies, then watched TV until it was time to do the sprinkles. He did sprinkles on one cookie and then wanted to eat it right away. How could I say no? These cookies are so good, it’s not easy to resist the temptation to eat one as soon as possible. I do recommend waiting to let the icing set up. They look prettier that way.

Iced Cut-Out Sugar Cookies

Enjoy the recipe…

Iced Cut-Out Sugar Cookies

  • Servings: 12 large or 24 small cookies
  • Print

Easy, delicious cut-out sugar cookies with firm edges and soft centers and a simple glaze icing. These cookies are great for any occasion!

This recipe was adapted from Holiday Cut-Out Sugar Cookies with Easy Icing from Sally’s Baking Addiction.

Ingredients

Cookies

  • 3/4 cup (170g) unsalted butter, slightly softened to room temperature
  • 3/4 cup (150g) granulated sugar
  • 1 large egg*
  • 2 teaspoons pure vanilla extract
  • 1/2 teaspoon almond extract (optional, but makes the flavor outstanding)
  • 2 and 1/4 cups (281g) all-purpose flour (spoon and leveled)
  • 1/2 teaspoon baking powder
  • 1/4 teaspoon salt

Easy Icing

  • 1 and 1/2 cups (180g) confectioner’s sugar/ soft icing mixture, sifted (must have no lumps)
  • 1/2 teaspoon pure vanilla extract
  • 1 teaspoon light corn syrup*
  • 2 – 2.5 Tablespoons (30-38ml) room temperature water
  • pinch salt*
  • food coloring, if using

Directions

  1. Plan ahead when making these cookies. Keep in mind that the cookie dough will need to chill, the cookies need to cool completely before being iced, and the icing needs 24 hours to completely harden. If you want to enjoy the cookies right away, and having hardened icing isn’t a priority for you, then you’ll only need about 4 hours to make these cookies.
  2. In a large bowl, using a handheld mixer or stand mixer fitted with the paddle attachment, beat the butter until creamed and smooth – about 1 minute. Add the sugar and beat on high speed until light and fluffy, about 3 or 4 minutes. Scrape down the sides and bottom of the bowl as needed. Add the egg, vanilla, and almond extract and beat on high until fully combine, about 2 minutes. Scrape down the sides and bottom of the bowl as needed.
  3. Whisk the flour, baking powder, and salt together in a medium bowl. Turn the mixer down to low and add about half of the flour mixture, beating until just combined. Add the rest of the flour and continue mixing until just combined. If the dough still seems too soft, you can add 1 Tablespoon more flour until it is a better consistency for rolling.
  4. Divide the dough into 2 equal parts. Roll each portion out onto a piece of parchment to about 1/4″ thickness. Stack the pieces (with baking paper) onto a baking sheet, cover lightly, and refrigerate for at least 1-2 hours and up to 2 days. Chilling is mandatory, for the dough to set up enough to hold its shape when making cut-outs.
  5. Once chilled, preheat oven to 350°F (180°C). Line 2-3 large baking sheets with parchment/ baking paper or a silicone baking mat. The number of batches will depend on how large or small you cut out your cookies. Remove one of the dough pieces from the refrigerator and, using a cookie cutter, cut in shapes. Transfer the cookie dough shapes to the prepared baking sheet. Re-roll the remaining dough and continue cutting until all is used. Re-chill the dough if it starts getting too soft and gooey. Then cut out more shapes until all the dough is used.
  6. Bake cookies for 10-12 minutes, until very lightly colored on top and around the edges. Do not overbake! Make sure you rotate the baking sheet halfway through bake time, unless you have a fan-forced oven.
  7. Allow cookies to cool on baking sheet for 5 minutes. Then transfer cookies to a wire rack to cool completely before icing. There is no need to cover the cookies as the cookies cool.
  8. For the icing, whisk together the confectioner’s sugar/ soft icing mixture, vanilla, corn syrup (if using), and 2 tablespoons of water in a medium bowl. The icing should be quite thick. If it looks too thick, add 1/2 Tablespoon more water. If it looks too thin, add 2 more Tablespoons of confectioners’ sugar. If you drizzle a little of the icing with the whisk, the ribbon of icing will hold for a few seconds before melting back into the icing. That is when you know it’s the right consistency and is ready to use. If desired, add liquid or gel food coloring. You can pour some icing into different bowls if using multiple colors. If not decorating cookies right away, cover the icing tightly and keep in the refrigerator for up to 2 days.
  9. Decorate the cooled cookies however you’d like. Squeeze bottles make decorating so easy. Enjoy the cookies right away or wait 24 hours for the icing to set and harden. Do not cover the cookies as the icing sets. Once the icing has set, these cookies make wonderful gifts. I find they stay soft for about 5 days at room temperature and up to 10 days in the refrigerator.

Notes

  1. Freezing Instructions: Plain or decorated sugar cookies freeze well up to 3 months. Wait for the icing to set completely before layering between sheets of parchment paper in a freezer-friendly container. Thaw cookies in the refrigerator or at room temperature. You can also freeze the cookie dough for up to 3 months before rolling it out. Prepare the dough through step 3, divide in half, flatten both halves into a disk, as you would do with pie crust, wrap each in plastic wrap, then freeze. Thaw the disks in the refrigerator, then bring to room temperature for about 1 hour. Roll out the dough as directed in step 4, then chill rolled out dough in the refrigerator for 45 minutes – 1 hour before cutting into shapes and baking.
  2. Egg: Room temperature egg is preferred to be easily dispersed in the cookie dough. Good rule of thumb: always use room temperature egg if recipe calls for butter at room temperature or melted.
  3. Corn Syrup: This is what gives the icing fabulous shine. You may leave it out if you aren’t concerned about shiny, glossy icing. I have never seen corn syrup here in Australia. I’m not sure what could be used in place of it. I didn’t use it, and the icing still looked lovely.
  4. Salt: I know salt isn’t a typical ingredient in cookie icing, but I like that little pinch of salt. I use about 1/8 teaspoon. OR you can add 1/4 teaspoon of salt to the dry ingredients in the cookie dough. I like it better used in the icing, though.

This recipe was created by Kim Sequoia for a delicious moment.

All written content and photos are copyright Kim Sequoia 2019 for a delicious moment.

Iced Cut-Out Sugar Cookies

Gold Glitter Vanilla Cupcakes

gold glitter vanilla cupcakes

It’s always fun to add a little sparkle to your New Year’s Eve celebration. I like to make something special to ring in the new year. Cupcakes are a perennial favourite for the occasion, since they’re single-serve, easy to hold, and portable–not to mention cute and delicious! I loved making these vanilla cupcakes with edible gold glitter for New Year’s Eve. The classic vanilla flavour goes beautifully with champagne, and the edible glitter adds a touch of sparkle to these delicious cupcakes.

gold glitter vanilla cupcakes

I think I went a little overboard with the frosting, since I used two layers. I don’t regret it one bit, though! New Year’s Eve is the perfect time for a decadent celebration. I love how high the vanilla buttercream frosting looks, and how rich and creamy it is. The cakes are so good, too. They’re full of vanilla flavour, because I used vanilla bean paste. I just love that stuff. It is so incredible for making anything vanilla-flavoured. Of course, any good quality pure vanilla extract works well, too.

gold glitter vanilla cupcakes

These vanilla cupcakes are great for just about any occasion, with or without sprinkles, edible glitter, or any other edible decoration you like. I hope you’ll enjoy trying the recipe.

Happy New Year!

Gold Glitter Vanilla Cupcakes

I loved making these vanilla cupcakes with edible gold glitter for New Year's Eve. The classic vanilla flavour goes beautifully with champagne, and the edible glitter adds a touch of sparkle to these delicious cupcakes.

This recipe was lightly adapted from Very Vanilla Cupcakes on Sally’s Baking Addiction.

Ingredients

Vanilla Cupcakes


  • 1 and 2/3 cup all-purpose flour
  • 1/2 teaspoon baking powder
  • 1/4 teaspoon baking soda
  • 1/2 teaspoon salt
  • 1 cup granulated sugar
  • 1/2 cup/ 115g unsalted butter, melted
  • 2 large egg whites
  • 1/4 cup full fat Greek yogurt (or vanilla Greek yogurt, plain yogurt, or sour cream—must be full fat, no matter which type of dairy you use)
  • 3/4 cup milk
  • 2 teaspoons vanilla extract or vanilla bean paste


Vanilla Frosting


  • 1 cup/ 225g unsalted butter, softened to room temperature
  • 3-4 cups powdered/ confectioner’s sugar/ soft icing mixture
  • 1/4 cup heavy cream (or use milk or half-and-half, but heavy cream will give the frosting a thicker texture) or full fat thickened cream
  • 1 tsp vanilla extract or vanilla bean paste
  • Kosher salt, to taste (optional)
  • Sprinkles, edible glitter, or other small edible decorations (optional)

Directions

To make cupcakes:


  1. Preheat oven to 350F/ 180C degrees. Line muffin tin with 12-15 cupcake liners/ pattypans. Set aside.
  2. In a medium bowl, whisk flour, baking powder, baking soda, and salt together.
  3. In a large microwave-safe bowl or Pyrex measuring cup covered loosely with plastic wrap, leaving a small hole for air to escape, melt butter in the microwave. Allow melted butter to cool slightly, then pour into the bowl of a stand mixer, or a large mixing bowl, if using a handheld mixer or mixing by hand. Using whisk attachment on low speed, mix sugar into melted butter. Mixture will be gritty. Mix in egg whites, yogurt, milk, and vanilla extract or vanilla bean paste until combined.
  4. Slowly mix dry ingredients into the wet ingredients until no lumps remain. Batter will be thick (unless using sour cream, then the batter will be a bit thinner).
  5. Divide batter among 12-15 cupcake liners and bake for 20 minutes or until a toothpick inserted in the center comes out clean. Allow to cool in pan for 2 minutes. Remove cupcakes from pan and place onto cooling rack. Cover with a clean tea towel. Allow cakes to cool completely before frosting.

To make frosting:

  1. Beat softened butter on medium speed with an electric or stand mixer. Beat for about 3-5 minutes until smooth and creamy. Add powdered sugar/ soft icing mixture, cream, and vanilla extract or vanilla bean paste with the mixer running. Increase speed to medium-high and beat frosting for 3 minutes. Add more powdered sugar/ soft icing mixture if frosting is too thin or more cream if mixture is too thick. Add salt if frosting is too sweet (about 1/4 teaspoon).
  2. Frost cooled cupcakes (such as a Wilton 1M piping tip). There may be leftover frosting, depending how much you use on each cupcake. If you want to have very decadent cupcakes, double the frosting on each cupcake by layering it on twice. There should be plenty of frosting to do this.
  3. Add sprinkles, edible glitter, or any other edible decorations you like on top of frosting (optional).

This recipe was created by Kim Sequoia for a delicious moment.

All written content and photos are copyright Kim Sequoia 2019 for a delicious moment.

Perfect Pumpkin Pie

Perfect Pumpkin Pie

I know there are tons of pumpkin pie recipes out there. BUT. This one is absolutely PERFECT. The pumpkin filling is silky smooth and beautifully spiced. It’s not overly sweet. The crust is easy to prepare, with no par-baking required. A dollop of lightly whipped cream adds the ultimate finishing touch.

Perfect Pumpkin Pie

The pumpkin pie filling in this recipe is 100% homemade. Of course, you can use store-bought canned pumpkin pie filling, and the pie will be nearly as good. If you’re willing to take the extra time to make your own pumpkin puree (which is super easy), then you will not regret it. Trust me. It’s worth the extra bit of effort. Homemade pumpkin puree, made from roasting a sweet pumpkin, is just so much richer tasting than the canned stuff.

pumpkin puree

I really didn’t have much choice except to make my own pumpkin puree, when I wanted to bake pumpkin pie for Thanksgiving, when I first moved to Australia. Pumpkin is served as a savoury dish here, not a dessert. Pumpkin pie filling is not something that is readily available, although I did see it in the new American section at my grocery store last year. It wasn’t Libby’s, though (I didn’t even know any other brand existed, when I lived in America!). I tried it, just for the convenience, since I was pregnant and feeling tired much of the time, and wanted to save time. It did the job, but it just couldn’t compare to homemade pumpkin puree. It’s worth noting that pumpkin puree is a bit runnier than canned pumpkin pie filling. That’s why it needs to cook down, to thicken up, before using it in the pie.

empty pie shell

I like to make an all-butter pie crust, for this recipe, but, sometimes, I buy it instead. You can use any pie dough you prefer. (My go-to pie crust recipe has always been Martha Stewart’s Pate Brisee.) I like to decorate the edges of my pumpkin pies with pretty leaf shapes. They’re very easy to cut out, if you have a small, sharp knife. Just wet the edge of the pie dough with a pastry brush and then gently press the dough leaves around the edge, overlapping them end to end. It adds a lovely touch to the pie, but it’s optional. I have also decorated the edges with a thin braid of dough, which was a bit trickier. You can always do the classic pinched edge, or use fork tines to make decorative lines around the edge, if you like.

pie dough leaves

wet pie edge

I’ve been making this pumpkin pie for several years now, and my family looks forward to having it every year at Thanksgiving. I had to convince my partner, who is Australian, that pumpkin can be really wonderful in desserts. He was skeptical. Then he had this pie. To say he has been converted to a pumpkin pie lover is an understatement. I’ve also had the pleasure of serving this pie to some Aussie family and friends, and they all loved it. I always bake two pies for Thanksgiving, because we all love it so much.  I hope you and your family and friends will enjoy it, too.

Perfect Pumpkin Pie

Perfect Pumpkin Pie

  • Servings: Makes a 9 inch pie
  • Print

I know there are tons of pumpkin pie recipes out there. BUT. This one is absolutely PERFECT. The pumpkin filling is silky smooth and beautifully spiced. It's not overly sweet. The crust is easy to prepare, with no par-baking required. A dollop of lightly whipped cream adds the ultimate finishing touch.

This pumpkin pie recipe was adapted from Chai Masala Pumpkin Pie on Food52. The homemade pumpkin puree recipe was adapted from smitten kitchen.

Ingredients

  • Butter, for greasing the pan
  • Pie dough, enough for a single-crust 9-inch pie, plus extra if making leaves, braids, or other decorative trim for edges
  • ¾ cup/ 190mL crème fraiche
  • 1 tablespoon cornstarch/ corn flour
  • 1 ½ teaspoon ground cinnamon
  • ¾ teaspoon ground ginger
  • ¼ teaspoon ground nutmeg
  • 1/8 teaspoon ground allspice
  • 2 cups pumpkin purée (see recipe below)
  • ¼ cup heavy cream/ thickened cream (not light/ low fat!)
  • ½ cup granulated sugar
  • 2 tablespoons brown sugar, light or dark, packed
  • 2 tablespoons pure maple syrup
  • ½ teaspoon medium-grain kosher salt
  • 3 large eggs, at room temperature

Directions

  1. Butter or spray oil in a 9-inch pie pan and set aside. (I like to use a Pyrex pan or a ceramic tart pan.)
  2. On a lightly floured surface, roll out the pie dough to be about 12 inches around. Fit the dough into the prepared pie pan, gently pushing the dough into the sides, and leaving the edges evenly overhanging on the outside. Fold the excess dough around the rim, to make a raised edge. A lot of filling will be going in, so a bit of height on the crust is necessary.
  3. Crimp or decorate the edge, if you like. I like making leaf shapes in another sheet of dough. To make a braid, roll extra dough (about 1/4 of a recipe for a single-crust pie dough) to 1/8-inch thick rectangle. Cut into long 1/8-inch strips and braid in groups of 3. Wet the pie dough edge with water or an egg wash made with an egg beaten with a tablespoon of water, using a pastry brush. Then gently place leaves or braid on top, carefully pressing down to secure. Use as many leaves or braids as needed to cover the edge, joining the ends for a braid.
  4. Put the pie shell into the fridge for 30 minutes, if using an aluminum pie tin, or for about 10-15 minutes, if using a Pyrex pie dish.
  5. Meanwhile, preheat the oven to 375° F / 190° C, with a rack in the lower third (this will help to cook the crust).
  6. Scoop the crème fraîche into the bowl of a food processor that has the metal blade in place. Add the cornstarch/ corn flour, cinnamon, nutmeg, ginger, and Allspice. Run the machine for 30 seconds, scraping down the sides of the bowl once.
  7. Combine the pumpkin purée, thickened cream, granulated sugar, brown sugar, maple syrup, and salt in a saucepan over medium heat. Cook, stirring constantly, until the mixture is sputtering and thickened, with a glossy sheen, 5 to 10 minutes.
  8. Pour the pumpkin mixture into the spiced crème fraîche and run the machine until blended, for 1 minute. Scrape down the side of the bowl, and process again for 2 minutes. Take off the lid and let the filling cool down a bit — about 10 minutes — the bowl should feel warm, not hot.
  9. Replace the lid and fire up the motor again. Add the eggs, one at a time, through the feed tube, stopping and clearing the sides of the bowl after each addition. Beat until well blended. Remove the bowl from the machine and carefully knock it against a counter to release any trapped air. Let settle for 1-2 minutes.
  10. Reduce the oven temperature to 350° F / 175° C.
  11. Pour the filling into the pie shell (only fill about 2/3 full, to avoid spilling over).
  12. Bake pie until the filling is puffed at the center and with only the slightest wobble, for about 40 to 50 minutes (or longer, depending on your oven).
  13. Transfer pie from the oven and cool completely on a wire rack (without the baking tray).
  14. Refrigerate pie within 2 hours after coming out of the oven. (The egg and cream in the pie filling requires refrigeration to stay safe.) Consume pie within 3 days. Serve chilled with a dollop of softly whipped cream on top.

Homemade Pumpkin Puree

  • Servings: Makes a 9 inch pie
  • Print

If you're willing to take the extra time to make your own pumpkin puree (which is super easy), then you will not regret it. Trust me. It's worth the extra bit of effort. Homemade pumpkin puree, made from roasting a sweet pumpkin, is just so much richer tasting than the canned stuff. It's worth noting that pumpkin puree is a bit runnier than canned pumpkin pie filling. That's why it needs to cook down, to thicken up, before using it in the pie.

This recipe was adapted from smitten kitchen.

Ingredients

  • 1 whole sugar pumpkin (or other sweet variety of pumpkin, see notes below)

Directions

  1. Preheat your oven to 400F/ 200C/ 190C fan-forced. Cover a large baking sheet with aluminum foil or baking paper.
  2. Cut whole pumpkin in half and scoop out the seeds. Place the 2 pumpkin halves cut sides down on the baking sheet.
  3. Roast the pumpkin until it is completely tender inside, about 45 to 65 minutes.
  4. Once pumpkin is cool enough to handle, scrape the pumpkin flesh off the skin with a large spoon (a metal spoon works well, because of the sharper edges).
  5. Puree roast pumpkin in a food processor until smooth.
  6. Allow puree to cool completely, and use as needed.
  7. Notes: 1 15-ounce can of pumpkin puree holds about 1 3/4 cups of puree. If you don’t have a sugar pumpkin, sweet potato, butternut squash, and red kuri squash will work instead. Sweet potatoes will roast faster, and so will smaller squash, but the method is the same: cut in half, roast face-down, scrape the flesh off the skin, and puree it until smooth. Sweet Australian pumpkin varieties include: Kent, Jap, and Queensland Blue.

These recipes were created by Kim Sequoia for a delicious moment.

All written content and photos are copyright Kim Sequoia 2019 for a delicious moment.


Dark Chocolate Spiderweb Cupcakes

It’s that spooky time of year again! I love to celebrate Halloween. Every year, I decorate the house with cute pumpkins, black cats, and other cute (but not too scary) Halloween decor.

My favourite thing to do for the occasion is to bake a special treat. Since trick-or-treating is not really something many people do here in Australia, where Halloween is still just becoming well-known, we don’t dress up in costumes or go out on Halloween. We enjoy our own homemade treats instead. (Ok, full disclosure… I do buy a couple of small bags of candy to pass out to any potential trick-or-treaters who might knock on our door, knowing that there is a 99.9% chance that no one will show up, and we will get to eat the candy ourselves.)

Dark Chocolate Spiderweb Cupcakes

Halloween is an American tradition that I love to share with my family. Being an American living in Australia, I like to carry on some of the traditions I grew up with in my own family, to help my children feel a connection to America. Making a treat, each year, makes the occasion feel more personal and more special, to me.

My little boy often likes to help me bake, especially when it comes to the fun treats we make for Halloween. Anything with chocolate or candy eyes will definitely get him excited to help! These delicious dark chocolate spiderweb cupcakes were so much fun to make. Needless to say, they did not last long. We each had one just as soon as the icing had set. My son had one while it was still warm. Expecting a small child to wait until icing has cooled is asking a lot. He didn’t mind it being a little messy.

These chocolate cupcakes are so good. The cakes are tender and moist, and the melted chocolate icing is really decadent. I recommend using good quality chocolate for the icing. The better the chocolate, the better the cupcakes will be. I like using 70% cocoa Lindt chocolate for the dark chocolate. I’m ok with using white chocolate melts, for the spiderwebs, though, since it is just a small amount.

Happy Halloween! I hope you will enjoy these cute and delicious cupcakes as much as my family did.

Dark Chocolate Spiderweb Cupcakes

These sweet, spooky chocolate cupcakes are so good. The cakes are tender and moist, and the melted chocolate icing is really decadent. I recommend using good quality chocolate for the icing. The better the chocolate, the better the cupcakes will be.

Cake recipe adapted slightly from Sally’s Baking Addiction. Icing recipe adapted from Kitchen Sanctuary.

Ingredients

Cake:

  • 3/4 cup (95g) all-purpose flour (spooned and levelled)
  • 1/2 cup (45g) unsweetened natural cocoa powder
  • 3/4 teaspoon baking powder
  • 1/2 teaspoon baking soda
  • 1/4 teaspoon salt
  • 2 large eggs, at room temperature
  • 1/2 cup (100g) granulated sugar
  • 1/2 cup (100g) lightly packed brown sugar
  • 1/3 cup (80ml) vegetable or canola oil (or melted butter)
  • 2 teaspoons pure vanilla extract
  • 1/2 cup (120ml) buttermilk, at room temperature
  • A dash of cinnamon (optional)

Icing:

  • 500g dark chocolate (I like 70% cocoa Lindt), chopped (or use dark chocolate melts, such as Cadbury’s)
  • 250g white chocolate

Directions

To bake the cupcakes:

  1. Preheat the oven to 350°F/ 180°C. Line a 12-cup muffin pan with cupcake liners/ pattypans.
  2. In a large bowl, whisk the flour, cocoa powder, baking powder, baking soda, cinnamon (if using), and salt together until thoroughly combined. Set the bowl aside.
  3. In a medium bowl, whisk the eggs, granulated sugar, brown sugar, oil (or butter), and vanilla together until the mixture is completely smooth.
  4. Pour half of the wet ingredients into the dry ingredients. Then add half of the buttermilk. Gently whisk for a few seconds. Repeat with the addition of remaining wet ingredients and buttermilk. Stir gently until just combined. Do not overmix, or the cakes will turn out rubbery. The batter will be thin.
  5. Spoon the batter into the liners/ pattypans. Fill only halfway, to avoid spilling over the sides or sinking. (This is very important!)
  6. Bake cupcakes for 18-21 minutes, or until a toothpick inserted in the center comes out clean. Allow cakes to cool completely before icing.

To ice the cupcakes:

  1. Prepare the dark chocolate and white chocolate in separate ceramic or Pyrex bowls or measuring cups by melting in the microwave in 30-second increments. Stir in between each time.
  2. Spoon 3 Tbsp of the melted white chocolate into a piping bag with a very fine tip.
  3. For each cupcake, spoon on a tablespoon of melted dark chocolate and smear it around so it covers the top of the cake.
  4. Next, pipe three concentric circles of melted white chocolate on top. Use a toothpick to drag lines from the center to the outside of the cupcake, to look like a spider web. Six or seven lines look good. You need to work quickly, before the chocolate firms up.
  5. Allow icing to set before serving cupcakes.

Store leftover cupcakes in the refrigerator for up to 5 days.

This recipe was created by Kim Sequoia for a delicious moment.

All written content and photos are copyright Kim Sequoia 2019 for a delicious moment.